在 App 中通常會把主要的幾個頁面放在下方 icon,讓使用者能夠方便操作,這個元件在 flutter 中稱為 BottomNavigationBar。
GoRouter 是 Flutter 官方所提供的套件,可以用來整合整個專案的路由,當這兩個功能整合在一起的時候,一個不小心呈現出來的效果就會差很多。
版本資訊
Flutter 3.3.4
go_router: ^6.0.0
先產生一個新的專案叫做 my_app
1
2
| flutter create my_app
cd my_app
|
加入BottomNavigationBar
在 MyHomePage 元件中找到 build 的方法,在 Scaffold 加上 bottomNavigationBar 的屬性,加上兩個有 icon 的元件。
1
2
3
4
5
6
7
8
9
10
11
12
13
14
15
16
17
18
19
20
21
22
23
24
25
26
27
28
29
30
31
32
33
34
| @override
Widget build(BuildContext context) {
return Scaffold(
bottomNavigationBar: BottomNavigationBar(
items: const [
BottomNavigationBarItem(
icon: Icon(Icons.search),
label: 'search',
),
BottomNavigationBarItem(
icon: Icon(Icons.add),
label: 'add',
),
],
),
appBar: AppBar(
title: Text(widget.title),
),
body: Center(
child: Column(
mainAxisAlignment: MainAxisAlignment.center,
children: <Widget>[
const Text(
'You have pushed the button this many times:',
),
Text(
'$_counter',
style: Theme.of(context).textTheme.headline4,
),
],
),
),
);
}
|
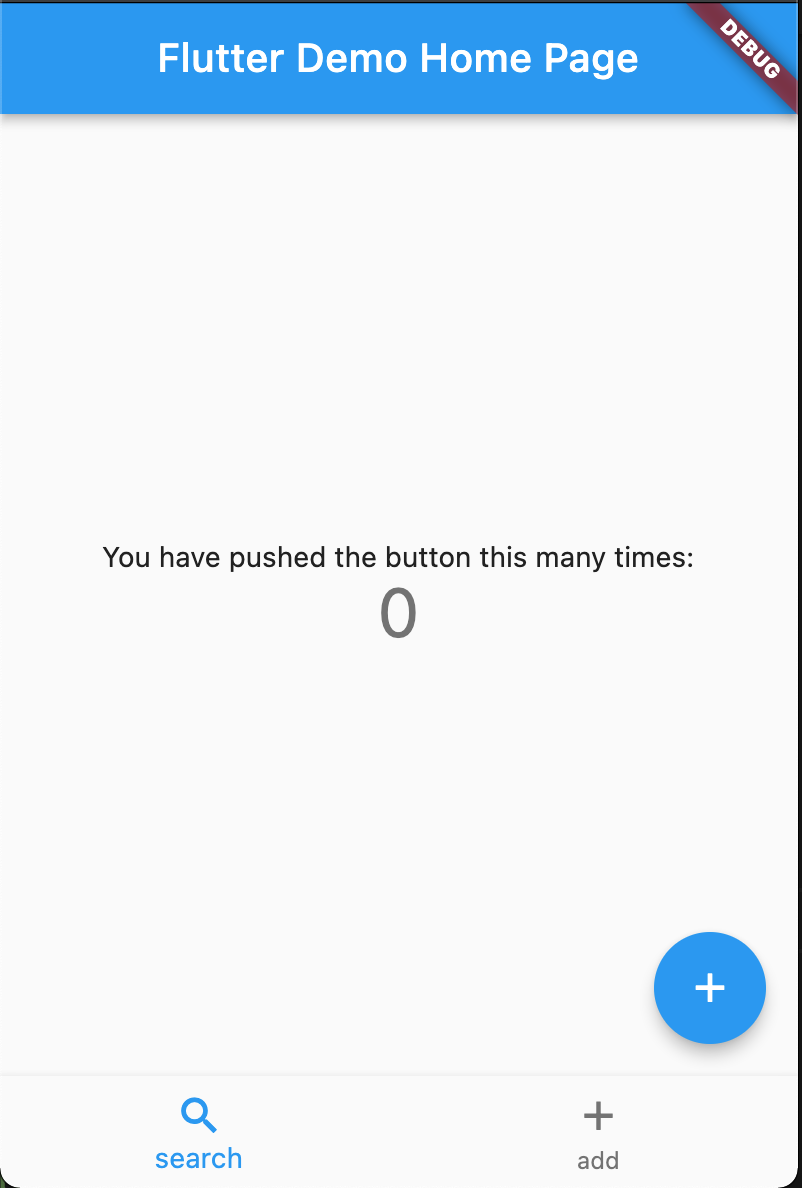
執行指令 flutter run 就可以看到畫面的下方有一個 icon 的區塊,顯示剛剛所加入的 search 和 add。
![navigation-bar-without-router]()
加入GoRouter
接著要來加入 GoRouter 這個套件。
1
| flutter pub add go_router
|
定義Router
定義兩個 route,會使用同一個元件,但是透過傳入不同 title 的內容來做識別。
找到 MyApp 這個元件,在 build 裡面加上這段。
1
2
3
4
5
6
7
8
9
10
11
12
13
14
15
16
17
18
19
20
21
| var router = GoRouter(
initialLocation: '/page1',
routes: [
GoRoute(
path: '/page1',
name: 'page1',
builder: (BuildContext context, GoRouterState state) =>
const MyHomePage(
title: 'search',
),
),
GoRoute(
path: '/page2',
name: 'page2',
builder: (BuildContext context, GoRouterState state) =>
const MyHomePage(
title: 'add',
),
),
],
);
|
接著要調整 return 的行為,原本是用 MaterialApp,現在要來改用 MaterialApp.router 才能加上路由的設定。
1
2
3
4
5
6
7
8
9
10
| return MaterialApp.router(
title: 'Flutter Demo',
theme: ThemeData(
primarySwatch: Colors.blue,
),
routeInformationProvider: router.routeInformationProvider,
routeInformationParser: router.routeInformationParser,
routerDelegate: router.routerDelegate,
);
|
最後回去調整 BottomNavigationBar 的行為,監聽 onTap 的事件,來達到切換頁面的效果。
1
2
3
4
5
6
7
8
9
10
11
12
13
| bottomNavigationBar: BottomNavigationBar(
items: const [
BottomNavigationBarItem(
icon: Icon(Icons.search),
label: 'search',
),
BottomNavigationBarItem(
icon: Icon(Icons.add),
label: 'add',
),
],
onTap: (index) => context.go('/page${index + 1}'),
|
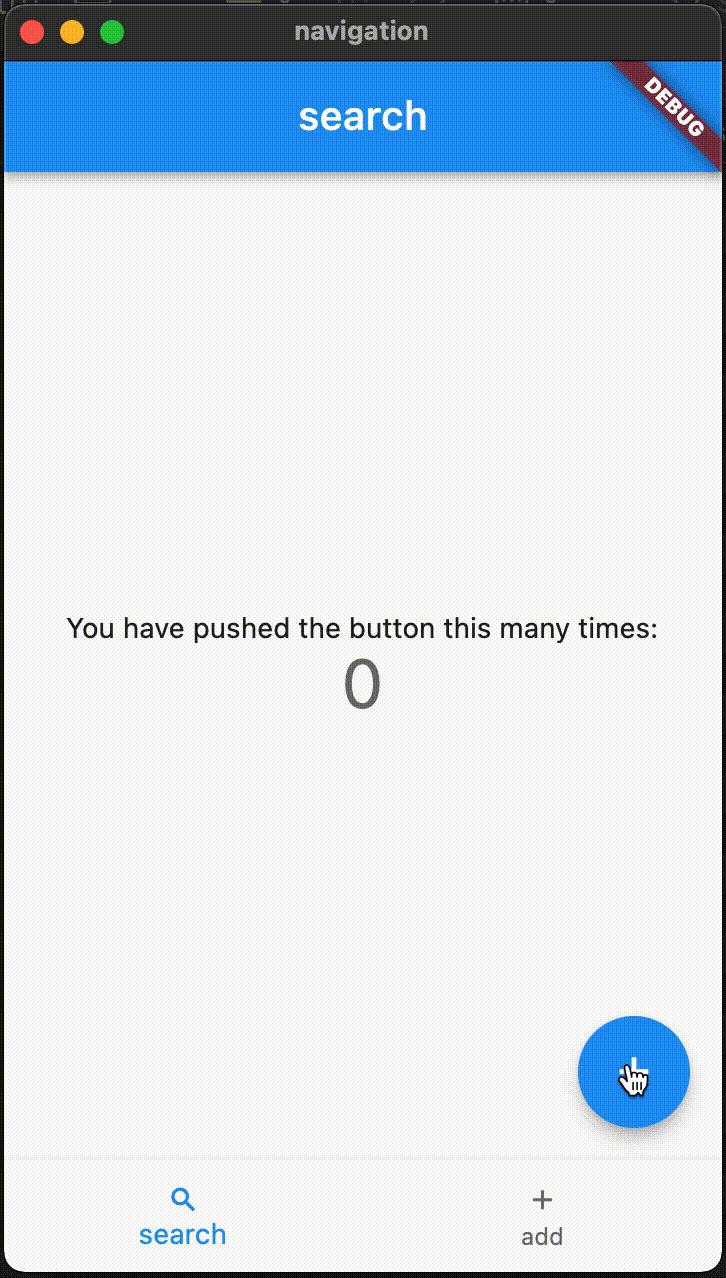
改好以後回到剛剛沒有中斷的 terminal 按下 r 做個重新整理,切換的頁面的功能是正常的,但是整個頁面包含 NavigationBar 也都跟著重新載入。
請先忽略點選了第二頁但是 icon 還是停留在第一頁的問題
![gorouter-navigation-bar]()
使用ShellRoute
根據 GoRouter 的介紹,當有需要 BottomNavigationBar 的時候,應該要採用 ShellRoute 的架構,就能夠只有內容重新載入。
接著就要動一個比較大的工程,要將 Scaffold 整個拉出來放到 ShellRoute 中。
建立一個新的元件,就叫他 ScaffoldWithBottomNavBar。
這邊方便就不切檔案了,直接一個 main.dart 到底。
1
2
3
4
5
6
7
8
9
10
11
12
13
14
15
16
17
18
19
20
21
22
23
24
25
26
27
28
29
30
31
32
| class ScaffoldWithBottomNavBar extends StatefulWidget {
const ScaffoldWithBottomNavBar({Key? key, required this.child})
: super(key: key);
final Widget child;
@override
State<ScaffoldWithBottomNavBar> createState() =>
_ScaffoldWithBottomNavBarState();
}
class _ScaffoldWithBottomNavBarState extends State<ScaffoldWithBottomNavBar> {
@override
Widget build(BuildContext context) {
return Scaffold(
bottomNavigationBar: BottomNavigationBar(
items: const [
BottomNavigationBarItem(
icon: Icon(Icons.search),
label: 'search',
),
BottomNavigationBarItem(
icon: Icon(Icons.add),
label: 'add',
),
],
onTap: (index) => context.go('/page${index + 1}'),
),
body: widget.child,
);
}
}
|
把這個元件加到路由的設定上面。
1
2
3
4
5
6
7
8
9
10
11
12
13
14
15
16
17
18
19
20
21
22
23
24
25
26
27
28
| var router = GoRouter(
initialLocation: '/page1',
routes: [
ShellRoute(
builder: ((context, state, child) =>
ScaffoldWithBottomNavBar(child: child)),
routes: [
GoRoute(
path: '/page1',
name: 'page1',
builder: (BuildContext context, GoRouterState state) =>
const MyHomePage(
title: 'search',
),
),
GoRoute(
path: '/page2',
name: 'page2',
builder: (BuildContext context, GoRouterState state) =>
const MyHomePage(
title: 'add',
),
),
],
),
],
);
|
前面已經將 BottomNavigationBar 抽出去放到 ShellRoute 中,回到 MyHomePage 元件將原本加上去的設定移除掉。
Scaffold 可以多次宣告,後面宣告的會疊加上去。
1
2
3
4
5
6
7
8
9
10
11
12
13
14
15
16
17
18
19
20
21
22
23
| @override
Widget build(BuildContext context) {
return Scaffold(
appBar: AppBar(
title: Text(widget.title),
),
body: Center(
child: Column(
mainAxisAlignment: MainAxisAlignment.center,
children: <Widget>[
const Text(
'You have pushed the button this many times:',
),
Text(
'$_counter',
style: Theme.of(context).textTheme.headline4,
),
],
),
),
);
}
|
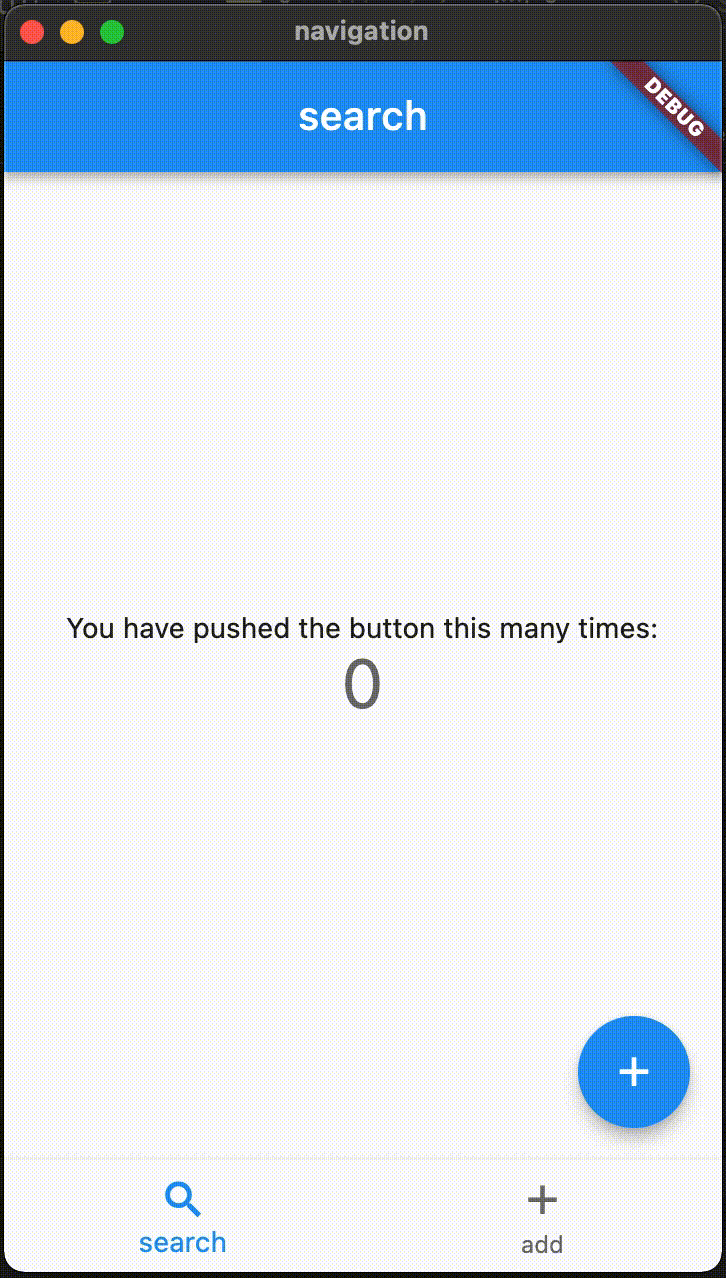
都改完後一樣回到 terminal 按下 r 重新整理,BottomNavigationBar 的區塊是固定的了,只有內容頁是不同。
![gorouter-shellroute]()
結論
在 web 上會很習慣這種功能的存在,轉到 flutter 時,一時間沒找到也沒特別注意到問題,後來是測試的時候才被點出來。一個元件使用上的小地方,用錯方法就會讓使用者看起來沒有那麼舒服(或是習慣?)。
最後附上完整的程式碼。