# my global config global: scrape_interval:15s# Set the scrape interval to every 15 seconds. Default is every 1 minute. evaluation_interval:15s# Evaluate rules every 15 seconds. The default is every 1 minute. # scrape_timeout is set to the global default (10s).
# A scrape configuration containing exactly one endpoint to scrape: # Here it's Prometheus itself. scrape_configs: # The job name is added as a label `job=<job_name>` to any timeseries scraped from this config. -job_name:"windows" scheme:http static_configs: # multiple target -targets: ["server1:9182","server2:9182","server3:9182"] -job_name:'cadvisor'
# Override the global default and scrape targets from this job every 5 seconds. scrape_interval:5s
static_configs: -targets: ['cadvisor:8080']
設定警報
警報規則
這邊用 windows 作為範例,產生一個 windows_rule.yml,監控 cpu/memory/disk 的使用率達到 90 % 以上的時候就要發送警報
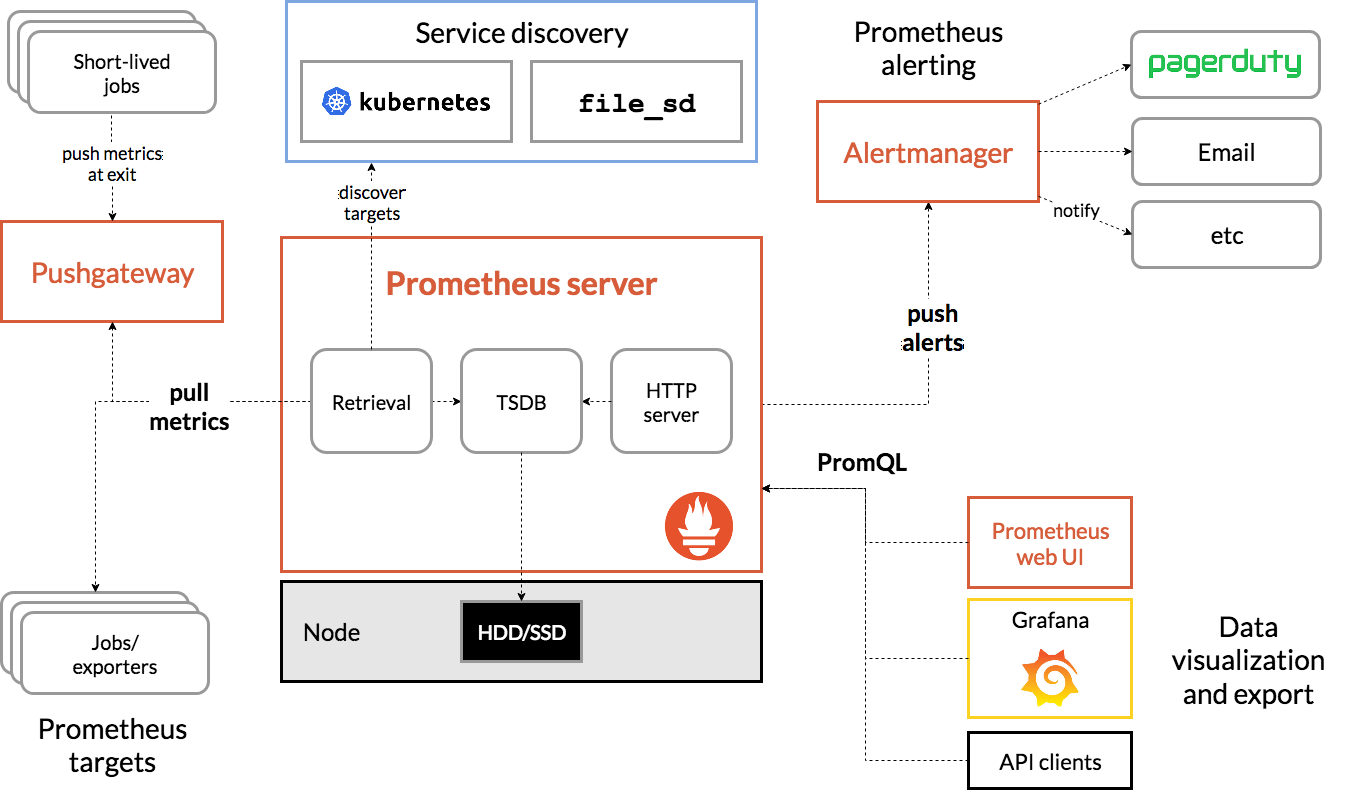
# Alertmanager configuration alerting: alertmanagers: -static_configs: -targets: -alertmanager:9093 # Load rules once and periodically evaluate them according to the global 'evaluation_interval'. rule_files: -"windows_rules.yml"
# my global config global: scrape_interval:15s# Set the scrape interval to every 15 seconds. Default is every 1 minute. evaluation_interval:15s# Evaluate rules every 15 seconds. The default is every 1 minute. # scrape_timeout is set to the global default (10s).
# Alertmanager configuration alerting: alertmanagers: -static_configs: -targets: -alertmanager:9093 # Load rules once and periodically evaluate them according to the global 'evaluation_interval'. rule_files: -"windows_rules.yml"
# A scrape configuration containing exactly one endpoint to scrape: # Here it's Prometheus itself. scrape_configs: # The job name is added as a label `job=<job_name>` to any timeseries scraped from this config. -job_name:"windows" scheme:http static_configs: # multiple target -targets: ["server1:9182","server2:9182","server3:9182"] -job_name:'cadvisor'
# Override the global default and scrape targets from this job every 5 seconds. scrape_interval:5s