系列文終於要來到最終章,前面的每一個都是重要的元素,但要怎麼整合起來會在這篇完整的交代
如果還沒看過系列其他篇的麻煩這邊請
[crop系列] 1 scale和position的糾葛、[crop系列] 2 canvas drawimage應用、[crop系列] 3 圖片mask、[crop系列] 4 drag實作
使用react作為範例
準備畫面
既然這是最終章,當然就是要把畫面什麼的都準備好啦,這邊就直接來把html、css準備好
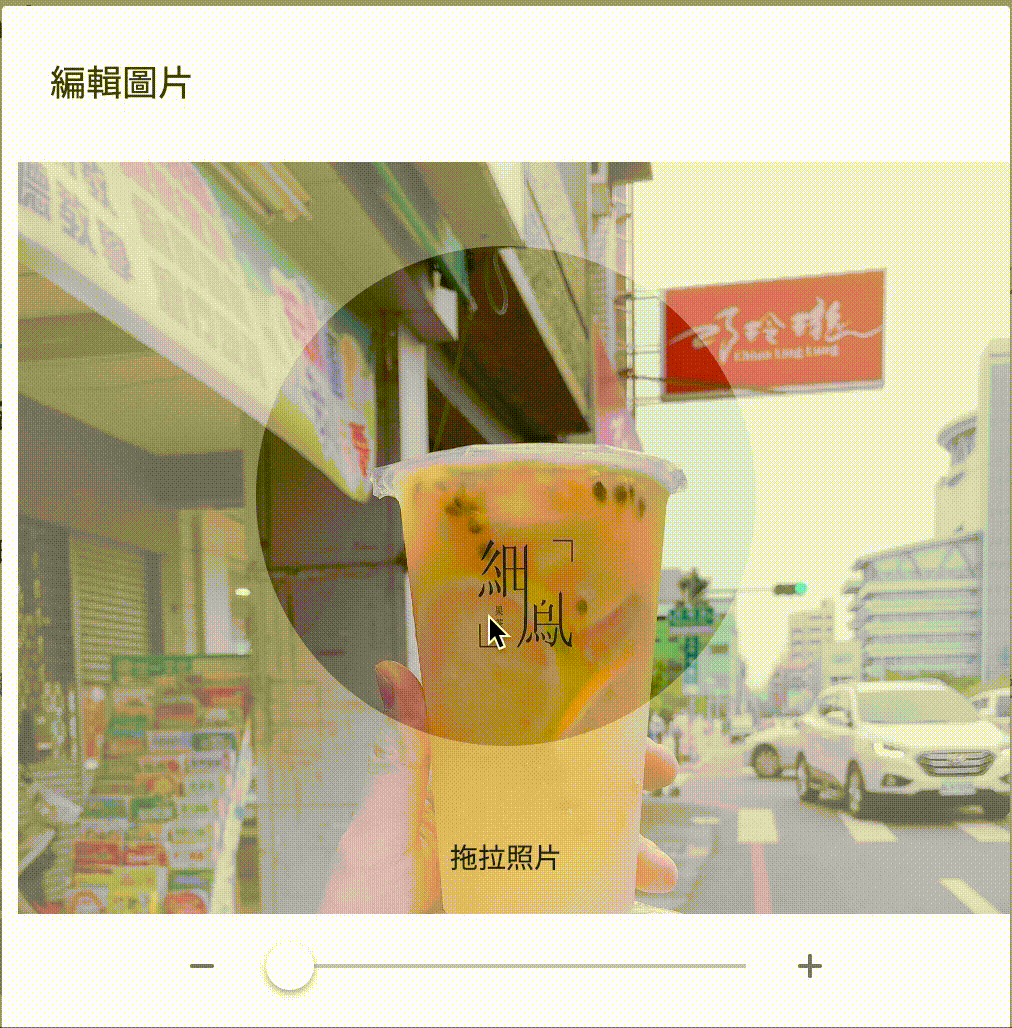
畫面的功能是這樣,一開始進去要先上傳圖片,然後接著可以開始放大/縮小/移動,最後按下確定,把區域內的畫面顯示出來
html
1
2
3
4
5
6
7
8
9
10
11
12
13
14
15
16
17
18
19
20
21
22
23
24
25
26
27
28
29
30
31
32
33
| <div>
<input
class="file-input"
type="file"
accept='image/*'
/>
<div class="crop-root">
<div class="photo-block">
<div class="photo-mask">
<img draggable="false" />
</div>
<img draggable="false" />
<div class="zoom-block">
<div class="zoom-out" />
<input
class="slide"
type="range"
min="1"
max="1.5"
step="0.01"
/>
<div class="zoom-in" />
</div>
</div>
<div class="button-block">
<button>
cut
</button>
</div>
</div>
<img />
</div>
|
css
1
2
3
4
5
6
7
8
9
10
11
12
13
14
15
16
17
18
19
20
21
22
23
24
25
26
27
28
29
30
31
32
33
34
35
36
37
38
39
40
41
42
43
44
45
46
47
48
49
50
51
52
53
54
55
56
57
58
59
60
61
62
63
64
65
66
67
68
69
70
71
72
73
74
75
76
77
78
79
80
81
82
83
84
| .crop-root{
border: 1px solid #808080;
position: relative;
}
.photo-block{
height: 440px;
max-width: 500px;
position: relative;
overflow: hidden;
img{
display: block;
position: absolute;
object-fit: contain;
max-width: 100%;
}
& > img{
background: #ffffff;
opacity: 0.6;
}
}
.photo-mask{
width: 100%;
height: 100%;
position: absolute;
left: 0;
right: 0;
top: 0;
bottom: 0;
clip-path: circle(125px at center 180px);
}
.zoom-block{
display: flex;
position: absolute;
bottom: 0;
padding: 18px 0;
width: 100%;
background-color: white;
justify-content: center;
}
%zoomIconLine{
content: '';
display: block;
height: 2px;
width: 0.75rem;
border-radius: 1px;
background-color: #808080;
position: absolute;
top: calc(50% - 1px);
}
%zoomIcon{
width: 1rem;
height: 1rem;
display: flex;
justify-content: center;
cursor: pointer;
}
.zoom-out{
@extend %zoomIcon;
&:before{
@extend %zoomIconLine;
}
}
.zoom-in{
@extend %zoomIcon;
&:before{
@extend %zoomIconLine;
transform: rotate(-90deg);
}
&:after{
@extend %zoomIconLine;
}
}
|
scale和drag結合
scale計算
前面用了兩篇各自的講到scale和drag,但是這兩個結合在一起以後計算的方式一定會有所不一樣,現在我們要把這塊完成
1
2
3
4
5
6
7
8
| const parent = this.dragNode.parentNode;
const maxLeft = parent.offsetWidth - this.dragNode.offsetWidth;
const maxTop = parent.offsetHeight - this.dragNode.offsetHeight;
point = {
left: this.validValue(point.left, 0, maxLeft),
top: this.validValue(point.top, 0, maxTop),
};
|
上面是前一篇所用的方法,如果不管邊界值,我們只要把this.dragNode的offsetWidth乘上scale值就可以
1
2
3
| const parent = this.dragNode.parentNode;
const maxLeft = parent.offsetWidth - (this.dragNode.offsetWidth * zoomValue);
const maxTop = parent.offsetHeight - (this.dragNode.offsetHeight * zoomValue);
|
接下來我們要把邊界的條件拉近來,並且邊界從四周改成中間的圓,也就是圖片不能超過圓形的範圍,因此計算的方式要重新來
圓為邊界
前面我們所用到的邊界取值的方式還記得嗎,使用目前值和最大最小做計算。
用圓當做邊界也是一樣,我們要拿到圓的上下左右四個值,而不能偷懶直接用0當做最小值,這邊先來個暖身沒有任何scale的問題要帶入
我們只要拿一邊來做計算,因此思考的方式要調整一下,先來看一下操作模式
![move]()
當圖左邊拉到圓的左邊時就要停止,而反邊的話是左邊拉到圓的右邊減去寬度,因此我們可以用這兩個值當做最大和最小
1
2
3
4
5
6
7
8
9
10
11
12
13
14
15
16
17
18
19
20
21
22
23
24
| const circle = {
radius: 125,
offsetY: 54,
};
const photoRect = this.dragNode.parentNode.getBoundingClientRect();
let circleNode = {
left: (photoRect.width / 2) - circle.radius,
top: circle.offsetY,
};
circleNode = {
...circleNode,
right: circleNode.left + (circle.radius * 2),
bottom: circleNode.top + (circle.radius * 2),
};
const minLeft = circleNode.right - this.dragNode.offsetWidth;
const minHeight = circleNode.bottom - this.dragNode.offsetHeight;
point = {
left: this.validValue(point.left, minLeft, circleNode.left),
top: this.validValue(point.top, minHeight, circleNode.top),
};
|
乎~第一版搞定,那接著就要把scale的變數加進來!
1
2
3
4
5
| const { offsetWidth, offsetHeight } = this.dragNode;
let minLeft = this.circleNode.right - (offsetWidth * zoomValue);
let minTop = this.circleNode.bottom - (offsetHeight * zoomValue);
let maxLeft = this.circleNode.left;
let maxTop = this.circleNode.top;
|
但這裡有個問題是,圖放大了,但是我們的座標本身是沒有放大,因此在做max、min的比較時,不能用放大後的值來運算,應該要換算回正確的值
1
2
3
4
5
6
7
8
9
| if (zoomValue > 1) {
minLeft = this.calOriginPosition(offsetWidth, minLeft, zoomValue);
minTop = this.calOriginPosition(offsetHeight, minTop, zoomValue);
maxLeft = this.calOriginPosition(offsetWidth, maxLeft, zoomValue);
maxTop = this.calOriginPosition(offsetHeight, maxTop, zoomValue);
}
const calOriginPosition = (originLength, value, zoomValue) =>
value + ((zoomValue - 1) * originLength / 2);
|
mobile放大-pinch
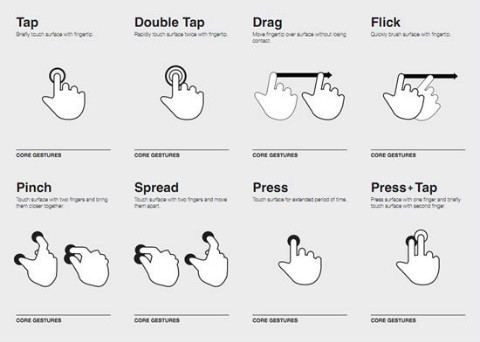
前面一篇有提到在mobile上的touch是一個陣列,為了可以記錄多點觸控時的位置,在mobile上scale有個名詞叫做**pinch**,可以看一下這張圖上面有各種在mobile上的操作行為
![gesture]()
這邊跟drag只有一個地方要調整,就是一定要觸控兩個點,接著變更zoomValue即可
1
| filter(event => event.touches.length === 2)
|
輸出
drag和scale都處理完以後就只剩下最後的輸出,在專案中為了上傳方便,因此使用的是blob來放檔案,當然你也能夠不要轉直接用base64做顯示,因為已經轉成blob,因此我們需要用URL.createObjectURL的方法去轉換成瀏覽器內部的連結
1
2
3
4
5
6
| afterCutBlob = blob =>{
const url = URL.createObjectURL(blob);
this.setState({
cutBlob: url,
})
}
|
不要忘記離開前釋放一下記憶體,可以參考一下這篇MDN,在這篇中我就沒有寫上去
小應用
這是一個在專案上用到的情境,designer跟我說希望一開始進去的時後,如果高比寬長,那就將寬設為圓的直徑,高等比比縮放,然後位置是在圓的左上角
這個需求其實很簡單,在image加上onLoad的事件,寫個判斷式,然後再把left和top重新計算取得正確的位置,就可以打完收工啦
1
2
3
4
5
6
7
8
9
10
11
12
13
14
15
16
17
18
19
20
21
22
23
24
25
26
27
28
29
30
31
32
| loadedImage = () => {
const {
naturalHeight,
naturalWidth,
} = this.image;
const stateName = naturalHeight > naturalWidth ? 'width' : 'height';
const diameter = circle.radius * 2;
this.image[stateName] = diameter;
this.setState({
[stateName]: diameter,
});
const {
left,
top,
zoomValue,
} = this.state;
this.calMovedPosition({
left,
top,
}, zoomValue);
}
|
結論
到這邊,整個功能已經算是介紹的差不多,剩下的就是把前面所講過的程式碼拼湊起來,需要的話請到這邊看demo
在這邊我用的是兩個image搭配出來的效果,但其實也有另一個作法是用canvas直接畫,如果有需要的話可以研究一下怎麼做,但我想作法應該是不會差太多
在這整個系列中,最麻煩的一定就是跟scale扯上關係,一有關係以後整個計算就變得麻煩,不斷的在做轉換的動作,其實這功能不難,只是在於一些小細節上要注意,踩過了就知道XD
範例中的Crop這個component沒寫的很好,做太多事情,如果有什麼好的建議歡迎告訴我喔🥂